
The fastest soil preparation method is to build a raised bed and fill it with a nice fluffy soil mix. It’s perfect to plant in right away. But filling beds can get expensive.
The special planting mix recommended for a raised bed is 1/3 peat, 1/3 compost, and 1/3 vermiculite.
2 cubic feet of vermiculite costs $20 alone. It takes 8 cubic feet of mix to fill a 4×4 bed to 6 inches. It might cost $40 to $50.
This is totally worth the cost if you have one or two raised beds. But what if you want large gardens and lots of them? It might exceed your budget, and fast.
Follow my journey through a year of discovery of what makes the best garden soil that won’t break the bank.
I’ll start with the tomatoes.
Did you know that tomatoes will grow like weeds under the right conditions? I didn’t. Tomatoes were always hard for me. And I’m supposed to have a ‘green thumb’.
As my neighbors would glory over their ‘bumper crop’, I would despair, asking what they did to get results like that? I didn’t consider the most important aspect of gardening… soil preparation.
Don’t you just throw some plants in the ground and watch them grow? uh, nooooo. Our midwest dirt is all clay. Of course, it doesn’t work. It’s the same if you have sandy soil, compact soil, depleted soil, or any soil that won’t drain.
Spring: Surprise Tomatoes
I had an old compost bin that I disassembled last year. When volunteer tomato seeds sprouted in the leftover compost, I was delighted. And they kept growing… and growing!
What surprised me more is that these plants didn’t need any help at all. I didn’t even water them. All that rich compost retains water really well.
Nature has taught me that soil preparation was they key to amazing plants. And you can do this for free.
Back to the tomatoes.
Unlike the tomatoes in the veggie garden that I baby… Pick the perfect plants, harden them off, water and weed daily… the surprise plants are at least double the size.
Check it out…
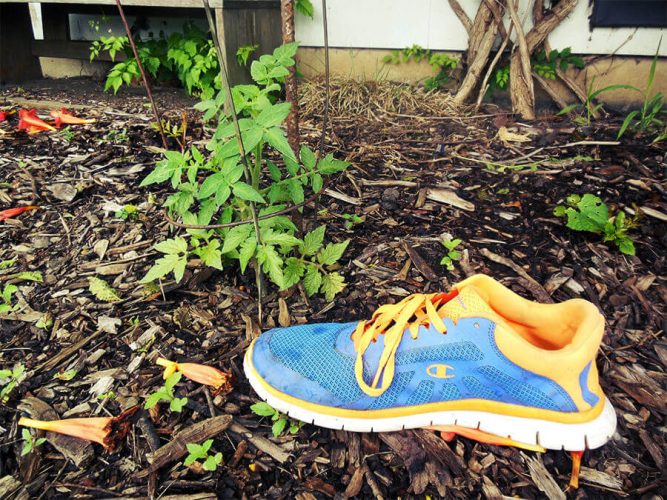
Tomato starts I planted. bah! puny. The weeds in the background are bigger.
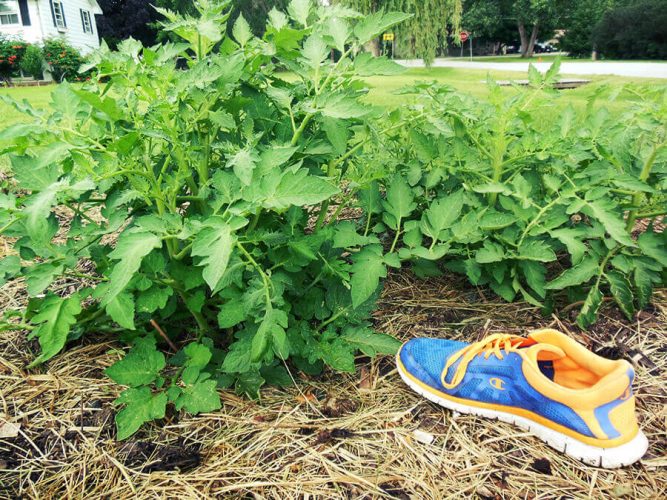
My surprise tomato plants growing in old compost. How’s that for wow factor?
How did this happen? How did these tomato plants grow like THAT? They didn’t get much of a head start. Really. it’s all about the soil.
How I Learned How Effective Soil Preparation Can Be
As I mentioned, this space was a humongous compost bin. It was smelly and ugly, right at the street where people walk by every day.
It had to go.
I wasn’t even sure what to do with the area until those volunteer seeds germinated and exploded into huge plants. By golly, put away the grass seed… this is a garden!
It quickly became clear that I’d been unwittingly preparing the perfect garden soil right there in that spot.
With the compost bin, I knew I was building soil for other gardens. My vegetable garden, my flower gardens, my nursery gardens. ALL THAT MOVING DIRT AROUND. And I’m reaaaally tired of wheelbarrows. When all I really have to do is start a compost bin, or pile, where I want to prepare the soil for a new garden. Talk about a lightbulb.
Why is common sense not so common? Especially for gardeners.
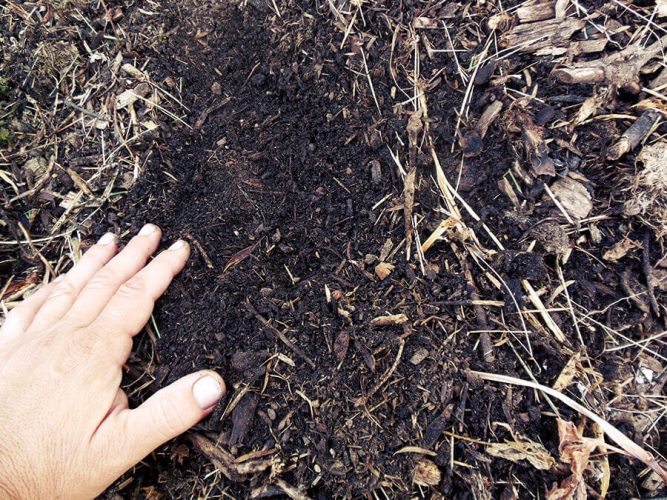
The stuff from the bin is fully decomposed and has made amazingly good soil. Light and fluffy, well-draining AND retains moisture, and it’s full of nutrients. The PERFECT soil.
There’s a good foot of compost here.
I have discovered what I’m sure other people have done. My new soil preparation method for new gardens. No digging, tilling, weeding. No hauling 15 loads of compost across the entire yard. And no killing my back.
My Soil Preparation Method:
Start compost in the location you want your new garden.
Making compost is easy. And pretty fun in my opinion. Grab whatever organic material you can get your hands on. Throw it on the ground. Walk away.
Do not dig up the grass… or till… or mow. Don’t even weed wack. I know, I know you think you have to. You really don’t.
Pile up grass clippings, yard debris, fall leaves, fresh leaves, wood chips, shredded paperwork, torn up newspaper, used coffee grounds (another good reason to go to Starbucks). The more ingredients you can find, the better.
Clean your neighbor’s yard, or ask them if you can have the bags they pile at the end of the street. They might be thrilled they don’t have to pay for trash stickers. I even asked my local landscaper to bring me his yard waste.
It doesn’t have to be smelly or ugly either.
Spread your new material on top of the pile in thin layers. When you get the right mix of greens and browns, it won’t smell. If there’s enough air and moisture, it breaks down quickly. You can spread it in a low pile and cover it with woodchips and it will even look nice. But keep building! You’ll need a lot.
How long do you have to wait for compost to break down and be garden soil? Heres a tip, every time you turn or mix compost, it takes half the time to decompose. I’ve had compost ready in as little as 3 weeks.
Is it ready yet? Dig a hole to the bottom of the pile. If you have at least 6-8″ of broken down material in the middle, you can plant in it.
If you start with great garden soil you’ll have amazing plants (I’ll show you in a few minutes)
What if you already have an established garden?
You already have a garden you say? And the plants grow ok…
If your garden is already established, keep spreading as much organic matter around the plants as you can get your hands on every year. 2 to 3 inches is recommended. Honestly, I’d add more. It doesn’t even have to be broken down.
Add a thick cover of mulch or woodchips to snuff out the weeds and hold moisture. Make sure to clear the crown of the plants so they get air, a good 2 inches.
And you can keep piling it on in layers. Organic matter, then cover with mulch or woodchips. Keep doing that all summer. In no specific order or any measured way. Again… leaves, grass clippings, yard debris, shredded paper, coffee grounds, wood chips, store-bought mulch. Whatever you can get your hands on because massive quantities is key. It breaks down faster than you can imagine.
All this organic matter feeds the network of microbial activity going on beneath the soil. Those microbes feed your plants and they all grow unbelievably.
Imagine a garden that you don’t have to dig, till, weed, or fertilize. AND grows vegetables and flowers like crazy. You only really need to know how to prepare a garden in the spring or maintain an established garden throughout the summer.
July
The tomatoes grew so great, I was psyched to see how well other plants would do here. Let’s try some perennial flowers, shrubs, and a few annuals.
I ran around the nursery on a mission to “save my babies”. I snatched up handfuls of pipsqueaks and the poor, sick plants, crying for help.
Sitting in black 1-gallon plastic containers in the bright hot sun – some plants were nearing their demise. Quickly, with very little thought, I filled in the rest of the garden.
Fastest garden I’ve ever planted.
In under 2 months, every single plant is thriving, some have quadrupled in size!
I hope I’m expressing how truly amazing this is. (maybe the photos will convince you)… July is very late to start a garden. No spring rain to boost growth, just sun, sun, and more sun. Even still, I watered this garden exactly twice. Once when the plants went in, and once a week later.
Though we didn’t have much rain, it probably didn’t need a second watering. I think I did it out of habit. All of this organic matter was the answer to dragging that heavy hose back and forth.
Soil Preparation Results by August:
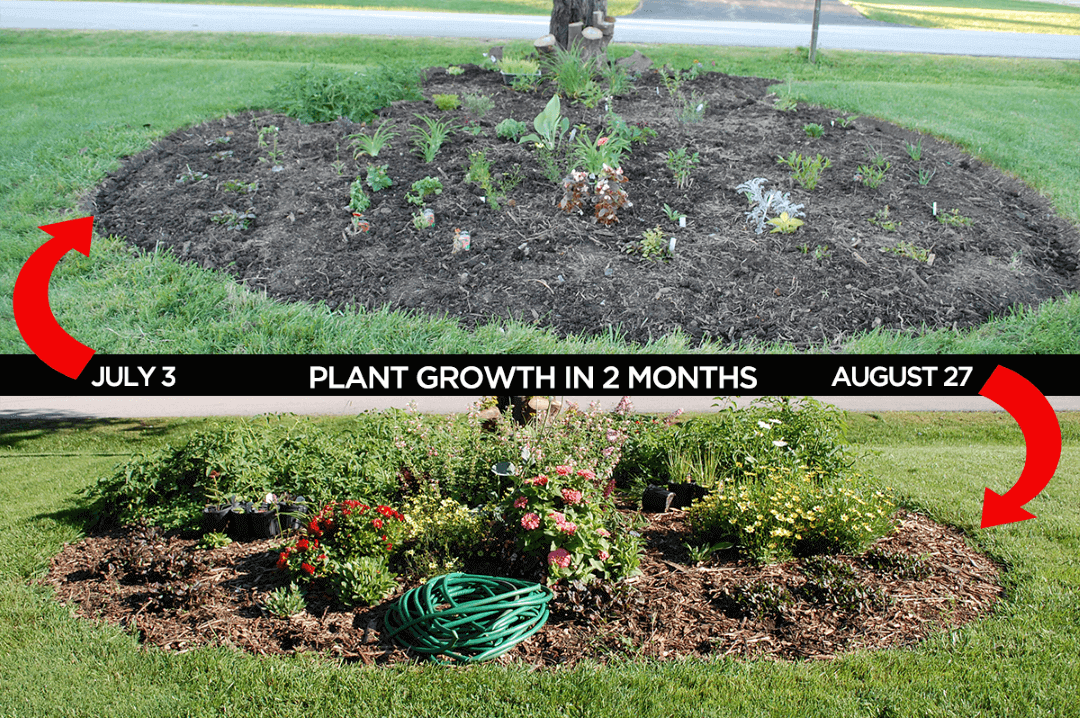
I mean, wow. I’ve never seen perennial plants grow that fast. AND… See how the hose is just sitting there, unused, in late August. 😀
My butterfly bush exploded. This shrub was just a few twigs when I put it in.

Ajuga groundcover. When I planted it, it wasn’t any bigger than my hand. Now I can’t even tell where the original plant started. It spread so far.
October… WORM INVASION!
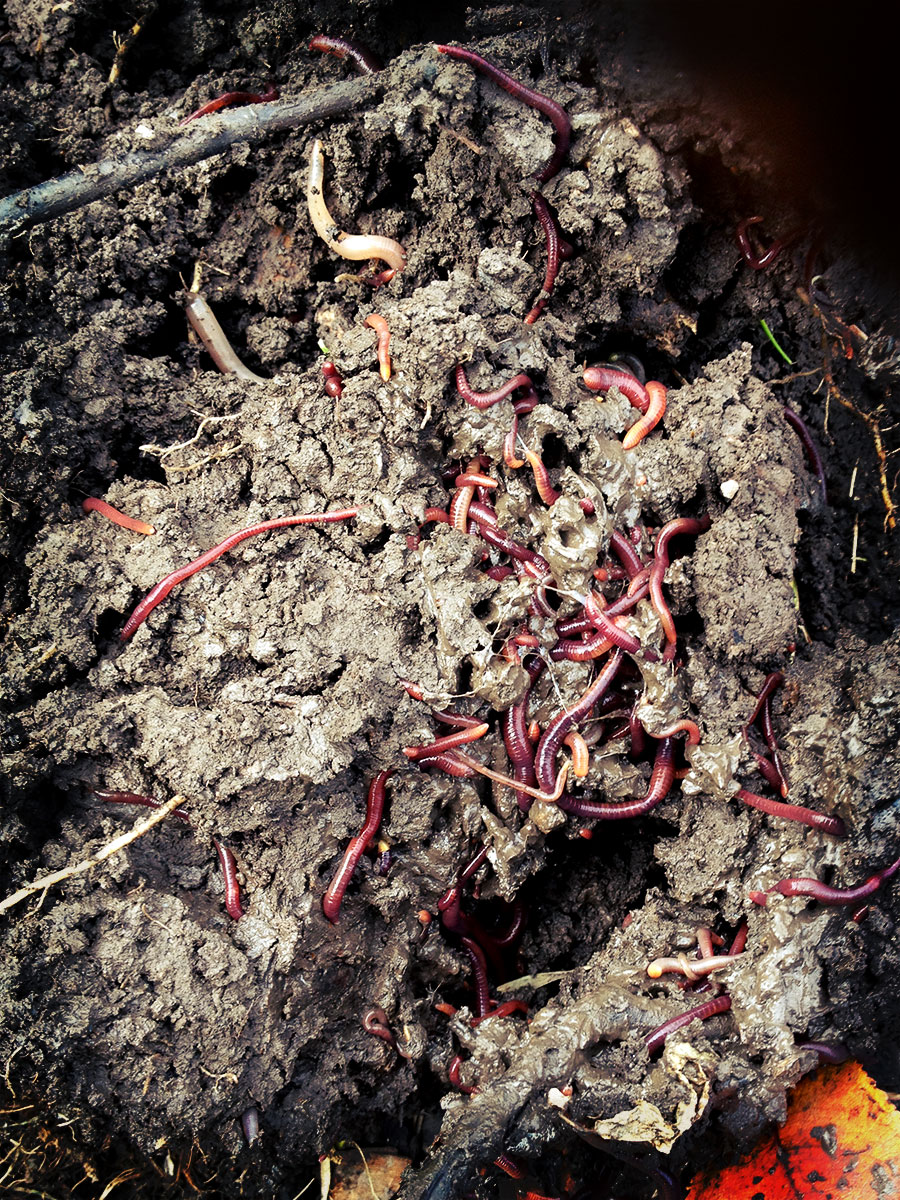
I honestly have never seen anything like it in real life. Click the photo to enlarge.
I HAVE seen this many worms in my research on vermicomposting (worm bins).
Digging this up was every bit as gross as the photos online. But if worms mean good soil, this soil is beyond amazing.
Here’s how THAT happened…
I never did stake those surprise tomatoes. I wanted to see how they’d grow without my ‘help’. The plant flopped and tomatoes rotted underneath all summer. Good for me for being lazy, ahem, brave enough to let things get messy.
When I cleared the last tomato and sunk the shovel to plant some grasses, I found this clump.
I learned another thing. Worms love rotten tomatoes.
I am not complaining! I’m very tempted to go get those rotten tomatoes put them right back in this garden. 😀
Have I told you yet? I like the idea of not moving a bunch of heavy compost around.
I also like that it’s better for the plants, to not disturb the activity going on in the soil.
I really like the idea of layering organic matter straight on top of an existing garden, the way nature does it. It’s hard work to keep moving stuff back and forth. And for what reason? I am sighing in relief at this very moment.
Geoff Lawton, the permaculture king, calls this “chop and drop”.
Prune your plants and drop the debris right under the plant. Yes, that gets messy. I have wood chips standing by to cover up the mess. And this mix of ‘green’ and ‘brown’ helps things break down even faster.
If you’ve seen the film ‘Back to Eden‘, they attribute amazing growth to wood chips as the magic ingredient. I use wood chips all the time and it’s fantastic for compost and an awesome weed-suppressing mulch.
Compost in Place
I like that you can literally throw what most people trash, into a pile on the ground, and have the best garden. Sure, you have to wait a while, but have you ever tried moving compost? Or digging an entire garden? It’s worth the wait.
For the original compost bin, I was a garbage collector for a year. My neighbors dumped their grass clippings in. We also hauled in a load of wood chips. They were in separate bins, don’t ask me why. As the grass clippings would begin to smell, I’d throw on a layer of wood chips. That’s how I experienced the most rapid composting breakdown. By mixing ingredients and turning the pile.
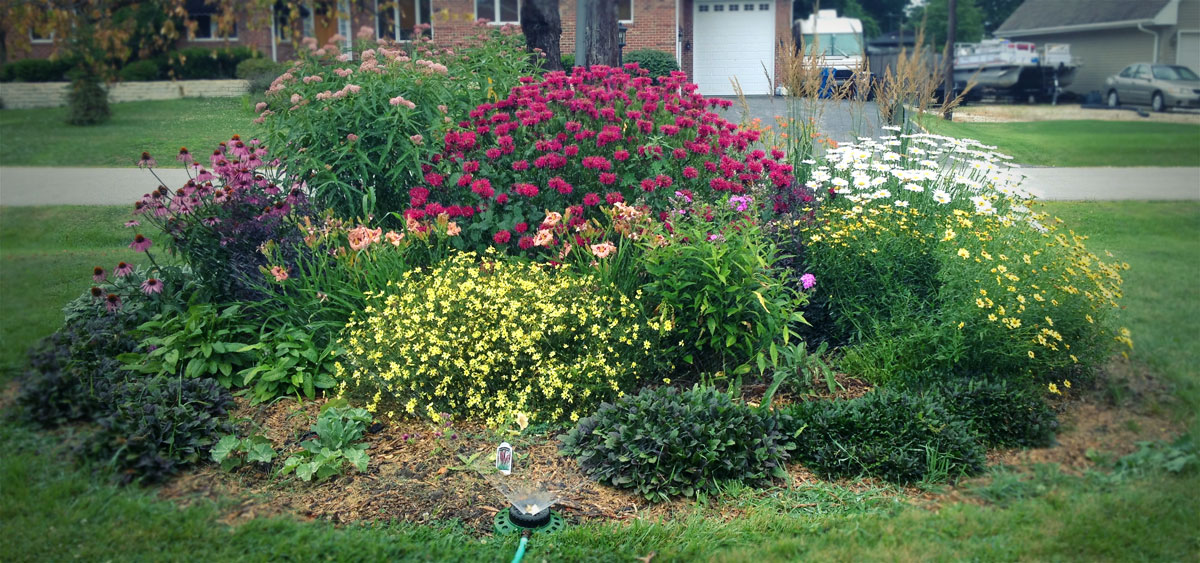
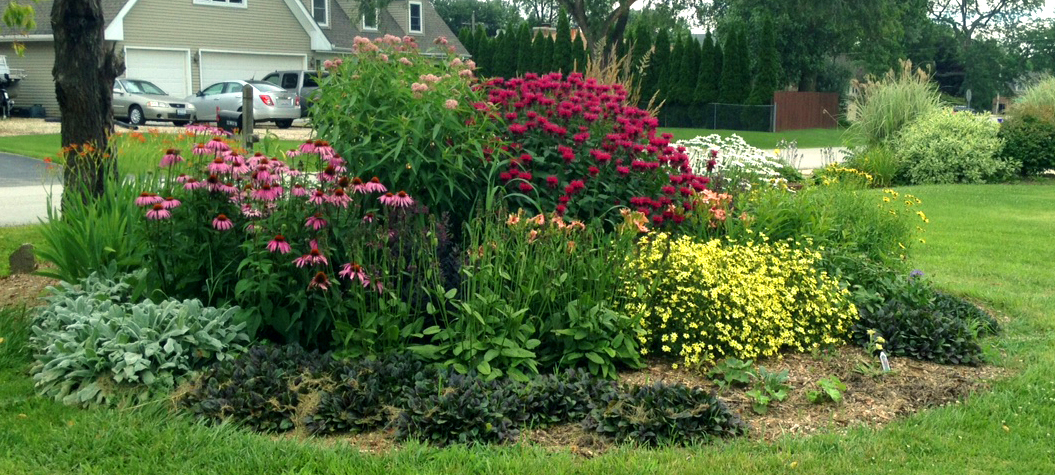
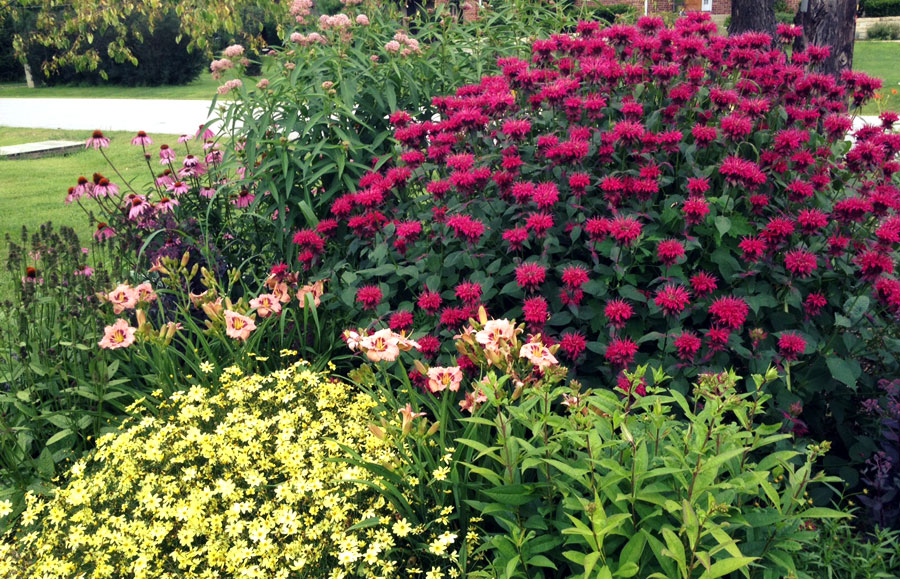
Next July… 1 Year Later
After 1 year, this garden has grown like nothing I’ve experienced in my 7 years of gardening. And it’s the talk of the town!
These plants are bigger, healthier and flower more profusely than anywhere else in the yard.
There is only one explanation. Great soil!
If you want these kinds of results, the easy way, use my soil preparation method for starting a new garden. Start a compost pile first. Your plants will thank you for it.
Remember, after a few years, all of that organic matter will be gone. So it’s important to keep adding compost and mulch around the plants every year. Use the ‘chop and drop’ method if you’re tired of lugging heavy material around.