
How to start a garden that will WOW! your friends… and put your neighbors to shame
Picture yourself in the most serene setting, rich with nature… deep green foliage, wildly blooming flowers, and the sound of birds stopping by for a visit. One that consistently takes your breath away with each passing season. Now imagine that it’s your yard. It only takes a little primer to create a BEAUTIFUL garden… and with this little guide, we’re gonna show you how.
The Planning Phase
Know Your Yard
To create a beautiful garden, you need to know what you’re working with. If you’re a gardener, you know your yard, but before you grab that shovel, spend some time in your yard, just looking. Owen Dell, author of Sustainable Landscaping for Dummies mentions that Zen designers in Japan spend an entire year ‘looking’, before they even think about touching anything. Good choices in the landscape are best made by careful observation.
Take a step back and really know all the areas of your yard by answering some questions.
- How much sun does it get?
- Where is the sun at different times of the day? year?
- Does the ground get enough water and where? Are there wet spots? Dry spots?
- What are your problem areas – and can any of them be corrected by adding or removing elements in the landscape?
- Are there any complications does your yard have you up against?
I’ll give you an example. I know that our heavy clay soil will cause problems any time I dig down. It’s going to flood, even if I only dig 6″. If I’m going to alter the natural soil level, I must carefully consider drainage. I’m equally as careful when I build UP, to watch where the rain will flow.
Know What You Want
- Getting what you want from your yard is a big deal when designing a plan. Knowing who will use the yard, for what purpose, and how much time you’ll spend there – all good questions to ask.
- Are you looking for privacy – and would a natural hedge fit in your design?
- Do you have leisure areas that are too hot to be comfortable – and are there natural ways to create shade… is there room to grow a tree?
- Do you want an area to entertain guests – and is there room to add a patio, tables
- barbeque pit? Will you need electricity and how far from the house are you willing to go?
- Do you have children or grandchildren – will you need a play area or a path for foot traffic that can take a beating?
- Do you want to grow vegetables – will you plant them right in with your flowers or create a separate area, and will it be wide open to wild animals or pets?
- How much work will it take to maintain? Are you willing to spend that much time in your yard weeding, watering, mulching, and mowing?
Landscape Design Basics
After all that watching and learning,I bet you’re ready to get started. You’ve dedicated the time, let’s formulate a plan and bring it to life.
Though you’re not limited in your design, two of the simplest design principles to start with are Sets of Three and Tall to Short.
Sets of Three Odd-numbered or asymmetrical plantings provide an organic feel, more like what you’d find in nature. Sets of three (five, seven) in staggered groups will mix things up and look more natural.
Tall to Short In order to see all of your plants, plant them tall to short, your tallest plants in the middle or back of a bed, working outwards or forwards with shorter plants, the shortest around your borders.
You may not want to be TOO rigid with this idea, it should still look natural. Sometimes, even with these two principles, you can create a beautiful garden. Other times it may not be that simple. Some landscapes offer more of a challenge. So let’s dig deeper into design.
Color, Line, Form, Texture, Proportion.
1. Color – when it comes to color, we think of flowers first. Unlike annuals, most perennials will not flower all summer, so it is possible to plan different color schemes at different times of the year. Foliage also varies in color. Green, Blue-green / Gray, Lime Green / Gold, Purple. Many plants change showing their beautiful fall colors adding yellow, orange, and reds. You can plan for seasonal interest and have a totally different colored landscape in the spring as you have in the fall. Along with trees, some shrubs such as Burning Bush, Forsythia, Viburnum, Spirea change color in the fall.
2. Line – A line is created by the edge between two materials, such as where the soil of a flower bed meets the grass. This is where you can get creative with your layout. Many landscapers create curved lines for a garden bed to replicate a treeline you might see in nature. A retaining wall or a rock path can also form a line. Use lines to segment your yard or create shapes in your landscape. Use it to direct the eye or even tell people where to go. A good example is to create a path up to a featured object in the yard, a patio, a favorite shrub, or even a birdbath.
3. Form – Forms are the geometric shape of plants or elements of your hardscape. Plant forms are usually upright, oval, columnar, spreading, arching / fountain-shaped, and weeping. Every object in your landscape will create a form. Hardscaping like patios will create squares and rectangles. You can control the form of your yard by choosing plants according to their shape and deciding their placement. You can repeat forms to create interesting patterns.
4. Texture – Texture is defined by how coarse or fine the surface of the plant or hardscape material is. Foliage, flowers, bark, mulch, sod, rocks, wood, and concrete all have different textures. Use texture to add variety and contrast to your design.
5. Proportion – You’ll need to know how big plants grow so they fit in scale with the surrounding elements. If you have a large house with a large yard, you’ll probably fill it with large plants. If you have a small yard, 12-foot plants might seem out of sorts and hog up the place. Keep this balance in mind when choosing plants.
Right Plant Right Place
Is it a sun lover, or better in shade? Will it tolerate flooding/drought. Will it provide privacy all year long (evergreen)? How big does this plant get? Remember, your plants are going to GROW. It’s common to plant them too close together, I’ve done it so often in the nursery. The result? An overcrowded space with plants competing for resources and survival.
Pro Tip: Carefully plan the spacing of immature perennials, and plant according to their mature size. It’s going to look uncomfortably bare. Don’t give in to the urge to move things closer together. Instead, plant annuals in empty spaces until your perennials grow to full size.
With all the plant choices out there, getting the right plant in the right place might make you sink in your chair, so we’ve created a list of our top choice plants. We’d like to help you find plants that you will love for years… plants that will love you back for putting them in the right spot.
This we hope will help you create a luxurious environment and will excite you year after year. Let’s not forget… WOW your friends, and shame your neighbors 😀
Plant Choices
List of Best Landscape Plants for Your Garden
The list of plants is endless. To make it easy, here’s our list of top 5 plants that we grow at our nursery, for each category. The list is based on their beauty, hardiness, and ease of maintenance. Most plants are rated zones 4 to 9, so they’ll work for most of the United States.
Perennial plants come back year after year. When choosing perennials for your landscape, be aware that they do not flower all summer. Before you invest in any plant, research a two things. Will it live happily in your zone? When does it flower (and for how long)? Many perennials only flower for a few weeks. Landscape designers overcome this by choosing multiple plants so something is always in bloom throughout the summer. For all summer-long blooms, we turn to annuals.
Large Shrubs – Top 5
When you need to fill large spaces, add interest to the farthest parts of the yard or create a focal point, start your landscape design skeleton with larger growing shrubs.
| 1. Hydrangea Paniculata | summer flowering | 8-12 feet | medium growth rate |
| 2. Weigela Florida | spring / summer flowering | 5-6 feet | fast growing |
| 3. Physocarpus (Ninebark) | summer flowering | 5-6 feet | medium growth rate |
| 4. Kumson Forsythia | spring flowering | 8-10 feet | very fast growing |
| 5. Dappled Willow | no flowers | 6-8 feet | very fast growing |
Perennials – Top 5
To fill in around larger shrubs or create a smaller garden, we use flowering perennials.
| 1. Shasta Daisy | early summer | 3-4 feet | white flowers |
| 2. Echinacea (purple coneflower) | summer | 3-4 feet | purple flowers |
| 3. Rudbeckia Goldsturm (black eyed susan) | summer | 3-4 feet | yellow flower |
| 4. Ornamental Grass | no flowers | varies | accent plant |
| 5. Monarda (bee balm) | summer- late summer | 1-4 feet | many clors |
Border Perennials – Top 5
For the front of the border or wherever you need short plants or groundcover
| 1. Sedum | late summer flowering | 1-3 feet | looks great all summer |
| 2. Hardy Geranium | summer | 1 foot | pink or purple flowers |
| 3. Stachys | early summer | 1-3 feet | purple flowers |
| 4. Ajuga | insignificant | 6 inches | great groundcover |
| 5. Dianthus | many different kinds | 1-2 feet | all flower colors |
Shade Gardens – Top 5
There are some very clear winners for the shady areas of the yard.
| 1. Hosta | many types and sizes |
| 2. Heuchera (coral bells) | many types and sizes |
| 3. Fern | non-flowering |
| 4. Brunnera | insignificant flowers |
| 5. Astilbe | many flower colors |
Annuals – Top 5 (for containers or borders)
| 1. Wave Petunia | spiller flowers |
| 2. Sweet Potato Vine | easy fast-growing. Trailing |
| 3. Impatiens, Begonia, Coleus | shade (some rated for sun) |
| 4. Geranium | many types |
| 5. Calibrachoa | hot new container plant |
Garden Plans
To put it all together, we’ve designed some gardens to get you started. Take the brainwork out of designing a beautiful garden and go for it!
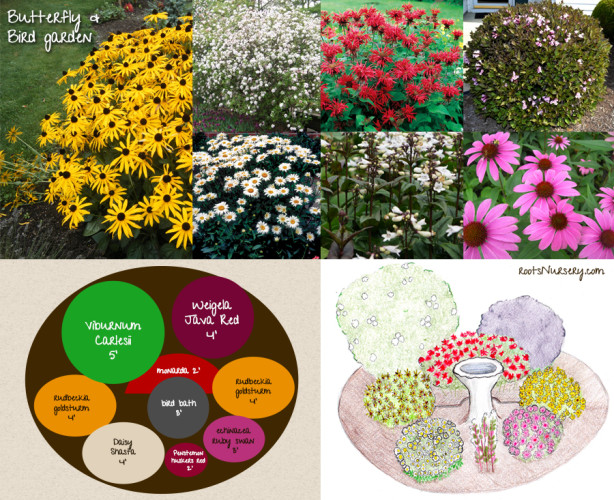
The Butterfly and Bird Garden
Keep the butterflies and birds coming back all summer with this beautiful, easy-to-install garden. It incorporates all the best flowers for attracting butterflies, small birds, and hummingbirds, plus a wide range of flower and foliage colors to delight us humans. Requiring only 12 x 14 feet, it’s easy to prepare, and with only 9 plants, it’s simple to establish. An overall winner for the beginning gardener.
Download the Butterfly and Bird Garden here.
The Winter Interest Garden
Love your yard all year long with this beautiful winter interest garden. Requiring approximately a 16’x14′ space, it features an impressive golden evergreen tree as a focal point, surrounded by lovely flowers all summer. Color combination, plant selection, shape, and placement are all top-notch in this garden, AND after the summer beauty fades, the winter interest kicks in.
Download the Winter Interest Garden here

Garden and Soil Preparation
Weed Removal to Prepare Garden Beds
It’s Time! It’s finally time, but you gotta take care of those weeds. Somehow. It’s probably the most important prep step you can take. First, I must say, you’re ALWAYS going to have some weeds.
If you snuff them out (from the choices below) weed seeds will blow to the top of your soil and start right back up again. You could vow to take exhaustive measures to prepare your beds, then stay diligently on top of weeding from there on out. Does this always happen? not exactly. We’re human. And gardens should be fun. Here are some methods I’ve used to prepare garden beds for planting.
1. Chemical All Vegetation Kill Sprays. Some of you are cringing at the mere suggestion, I know, but zapping it with chemicals IS an effective way to kill all of the weeds quickly. If you’re more hardcore organic, just say – ‘next’…
2. Layering Technique. This method is being used by no-till gardeners everywhere. It’s a great way to prepare a garden bed and keeps the soil structure intact. Measure out your garden bed and cover it with layers of newspaper or cardboard, then a layer of compost or garden soil, then a layer of mulch.
How much of each layer? It’s entirely your choice how ‘raised’ your bed is. I’d say, lean toward the ‘a lot’ side. The thicker your layers, the better to keep the soil healthy and your weeds at bay.
A note about newspaper. I’ve used this all over my yard, it really does help keep the weeds down. Lay it on THICK and cover it well with dirt or mulch. On a few occasions, I’ve received a shipment of plants that NEEDED to get in the ground, but there were no beds prepared. I dug a hole straight into an open area, planted my plants, covered the surrounding grass with newspaper, then filled back the dirt from the hole. Crude, but it worked in a pinch. Did it last? Not very long, I needed to treat that bed again later that
season, but it was extremely easy to do.
3. The ‘Hot Summer’ Clear Plastic Kill. The nursery has been in a state of ‘under construction for the last 3 years. Weed barriers under the pots is a must and plastic does the job well. I discovered how effective clear plastic is at killing grass when I ran out of black plastic. After three or four 90 degree days of the hot sun shining through clear plastic, the grass and weeds were toast. So yes, this works best in summer. I haven’t tried it in spring, but I imagine you might be waiting a while for the grass to die. I use a tiller for this method unless I’m preparing a small area. I till as deep as my little Mantis will go since our soil is terrible clay, I add as much light weight compost as possible. I will only till once.
A Word About Good Soil
You probably know that most plants thrive in good soil. Get your soil right and you’ve already won half the battle. But how do you know what you have? There are three simple tests you can do without having to run out and buy anything. The Jar Test, pH test and the earthworm test.
You can see how to do all three here. In most cases your soil will need to be amended by adding organic matter which creates great garden soil. Home builders strip much of the topsoil when building a new home and don’t put it back. Adding rich homemade or store bought compost can help in almost every garden situation. Every year you can add another layer of compost to the top of your gardens, without having to dig up your plants. It will break down and add nutrients to the soil. You can use mulch as well. Adding mulch not only looks pretty, but it helps absorb water so you water less, and also breaks down adding nutrients to the soil. Each fall we gather leaves and cover our plants for the winter. Every spring we add wood chips as a mulch. Keep adding good stuff to your soil and your plants will love you for it.
A Word About Wood Chips
We use wood chips in our nursery wherever we don’t want weeds to grow (thats everywhere isn’t it?) A thick layer goes on top of every garden bed and every pathway here. We use wood chips as a mulch because it creates a natural organic weed barrier and adds organic matter to the soil, but the best reason of all… its free.
Installation
Measure Your Space
You’ll need to measure your area correctly and place plants at the spacing suggested. If a shrub grows 8 to 12 feet with an 8-foot spread, mark your center and measure 4 feet out on both sides, plus desired spacing in between plants. It might look bare with small young plants, but in the early growing years, you can always fill in space with perennials or annual flowers, until it starts to get crowded.
I mention this twice in this guide because of the sheer fact of how many times I’ve messed it up over the years. Overplanting is a very bad habit of mine. Now that I’ve discovered the joy of annuals, I can go crazy with it. Winter will kill all of my overplanting before it gets too crowded.
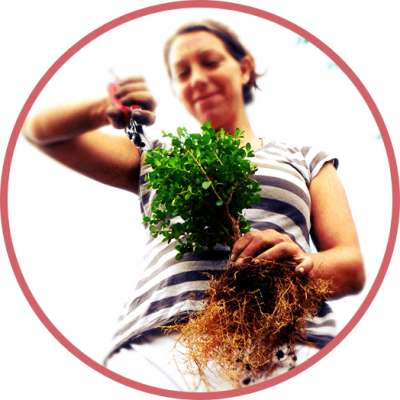
Dig Your Holes
The rule of thumb for digging the correct size hole is: twice as deep and three times as wide as the rootball. Add some good compost to the dirt you’ll fill the hole with. Mushroom compost is some of the best compost out there, but it can get expensive. Just make sure your compost is light and fluffy with a lot of organic material to feed your plants and worms!
Planting
When you plant your plant, make sure to look at where the stem meets the soil in the pot. This is the depth you want to plant, keeping that same soil level it’s used to. Plant too deep and the stem will rot and the roots wont get air. Plant too high and the stem will dry out. Pack the soil in tightly around the plant. This will prevent ‘heaving’ (see below). Add 2-3” of mulch, making sure that its 3” away from the stem. Mulch retains water so you wont have to water as much, but it will also rot the stem if its too close.
Heaving happens in the winter when the freeze-thaw cycle contracts and expands the soil and pushes the plant up out of the ground. Make sure to check your plants throughout the winter to make sure this is not happening. If so, pack it back in the ground again tightly, or gently lift and replant, adding more soil.
Maintenance
Watering
Keep your plants well-watered until they’re ‘established’ or well enough rooted into the ground to draw enough water to live on their own. You want the soil moist, not dry or waterlogged. Water well immediately after you plant, then wait until the top of the soil dry and water again. I like to water until it pools a little, let it soak in, and do this two more times. Avoid wetting the foliage. The point is to water the root ball and the soil around it so that the roots want to grow outwards, into your soil. This helps your plant establish itself faster. Make sure to keep an eye on your new plants and water more in drought conditions. Usually, after the 2nd year, your plants will be fully established and should be able to live on their own. Of course, wilting is a sure sign that a plant needs more water, and even fully established plants sometimes need water.
Weeding
Keeping the weeds in your lawn taken care of will also help cut down on weeding in the garden. With all of these efforts, you WILL have weeds. Its natures way of protecting the soil. Some people find it easier to keep a daily or weekly weeding schedule. Walk your property and gardens every day and pull each weed you see. Or, Split your property into sections and weed one section each day of the week. Take it from someone who has learned the hard way, its best to keep up with weeds then to take care of it later. It only gets harder
Mulching
If you mulch every year you won’t have much weeding to do. Mulching means covering the soil to protect it, and you can use just about any material to do it. Compost, wood chips, leaves, even newspaper. Mulching is so beneficial to your garden soil and the plants that live in it, you’ll be happy to make it a yearly practice. As stated before, the more the better. Most people recommend 2-3 inches, but if you can do more, definitely do more.
Wrapping Up
Well, there it is, a BEAUTIFUL new garden that YOU created. It’s always a wonderful feeling to sit back and look at a job well done. We hope that it brings you years of enjoyment and luxury to your home. If you found this guide useful, please, share it with a friend!
More About Us
Trish is a licensed nurseryman certified by the state of Illinois. She is the owner of Roots Nursery, a backyard nursery that sits on a one-acre lot in the western suburbs of Chicago.
“Hardy, beautiful, easy to grow plants shouldn’t cost an arm and a leg. Because were a ‘homegrown’ nursery without the expense other nurseries have, we can offer great prices. Not only are the plants affordable, we always get compliments on how beautiful and healthy they are.